Page 3 of 4
Re: VTRNZ
Posted: Fri Jul 26, 2019 5:44 am
by legendlives
I thought it looked a bit 'slabby' so I took out the grinder and:
Added the little cut-out bits that will house the indicators, and also added more material to the sides to help hide more of the wiring etc.
Re: VTRNZ
Posted: Sat Jul 27, 2019 12:46 am
by legendlives
Back to the underseat rad, this sprouted mount brackets which take the original Storm radiator rubbers:
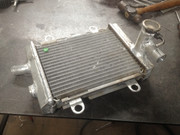
Then small threaded tabs to take the original fan:
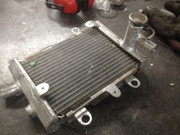
Which all looks very spunky in place:


You may notice there is also a new filler neck and top hose take off. I wasn't happy with the first incarnation so remade it longer (as there's no height restriction). It was also far easier to weld!
Re: VTRNZ
Posted: Sat Jul 27, 2019 10:54 pm
by legendlives
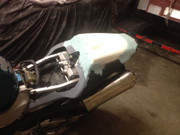
There's nothing better on a Sunday morning than to wake up with the sweet smell of plastic welding......
Seat unit coming on. Pictures to follow!
Re: VTRNZ
Posted: Sat Jul 27, 2019 11:39 pm
by sirch345
You're moving along in leaps and bounds

Well done, keep up the good work

Chris.
Re: VTRNZ
Posted: Sun Jul 28, 2019 7:45 am
by legendlives
Thanks Chris. I get itchy fingers if I don't do anything......
The seat unit is now well underway. I ground & cleaned the plastic inside & out and riveted small aluminium plates to hold the 'hump' in the right place while I plastic-welded the two parts together. Ground out the welds and slopped on a bit of filler and:
Both cans are now in about the right place, ready to make the link pipes up between the original system and the cans

And new (but not picture worthy) rivnuts added to the rear subframe so the radiator is now mounted.
Re: VTRNZ
Posted: Fri Aug 02, 2019 1:03 am
by legendlives
More welding and mods to the rear subframe last night. It's nearly finished. You'll be impressed!
Ordered a couple of Stainless bends for the exhausts which should be here early next week.
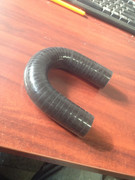
And this arrived today. A whole $10NZ and the solution to one of the cooling system problems!
Re: VTRNZ
Posted: Sun Aug 04, 2019 10:39 pm
by legendlives
I'm that into this build that I've given it it's own facebook page:
https://www.facebook.com/Stormfighter-1 ... _todo_tour
Comments welcomed!
Somewhere to sit
Posted: Tue Aug 06, 2019 8:53 pm
by legendlives
The seat base is made from the front half of the 'Storm seat base with an aluminium construction riveted to it.

I've tried to fill up the 'gaps' between the original seat line and the Fireblade seat unit by extending the bottom skirt down. These will need reshaping and forming a bit to better follow the lines.

Because all of the aluminium work is welded together the side skirts will help to add strength and rigidity to the bumstop part.
Talking of aluminium welding, there's a lot of it!

Overall I'm very happy. Now that the seat base is done I can continue to finish and shape this and the tail section together so that they will fit and look like they were made to be together.

Re: VTRNZ
Posted: Tue Aug 06, 2019 10:26 pm
by tony.mon
The seat is starting to have a little of the SP about it.... Nice work.
Re: VTRNZ
Posted: Tue Aug 06, 2019 11:01 pm
by sirch345
Skilful work with the alloy plate
Chris.
Re: VTRNZ
Posted: Thu Aug 08, 2019 3:39 am
by legendlives
sirch345 wrote: ↑Tue Aug 06, 2019 11:01 pm
Skilful work with the alloy plate
Chris.
If you like alloy plate you'd love my hot rod:
https://www.facebook.com/mk1gasser/
Re: VTRNZ
Posted: Thu Aug 08, 2019 7:33 pm
by sirch345
Many thanks for the link
It certainly looks one hell of a beast of a machine


Chris.
Underseat part 4
Posted: Sun Aug 11, 2019 5:54 am
by legendlives
Time to get the hoses pointing in the right direction.
Top hose was easy, take the thermostat housing:
And turn it round 180 degrees! The bolt pattern is symmetrical so it's a straight turn around. The other bit of luck is the original short bottom hose has exactly the right angles to miss everything!
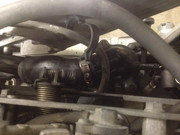
Add these little turned joiners and plonk in lengths of -16 AN braided hose
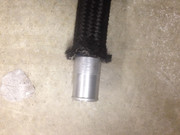
The joiner nestles next to the rear cylinder head:
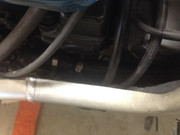
and the top hose will run something like this:

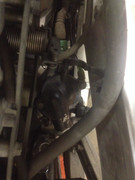
The bottom hose is less tidy, but still a load better than looking at those ugly side radiators.
Silicone reverse angle and another alloy joiner:
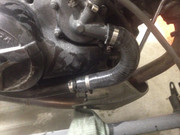
And will run something like this:

It will all have to come apart again to pretty everything up, but it's nice to see the plan is coming together.
Re: VTRNZ
Posted: Sun Aug 11, 2019 9:53 am
by fabiostar
Re: VTRNZ
Posted: Mon Aug 12, 2019 9:23 am
by legendlives
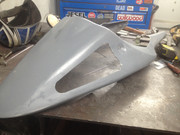
After a bit of sanding and a dusting of primer the seat unit is now Carlos and not South of Guildford.
Eagle-eyed readers will notice that the top and bottom of the seat unit were not welded down the sides. The reason is:
With a bit of mesh (liberated from a waste paper basket)
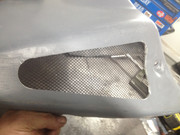
With the tail painted white and the mesh in black hopefully it will look like a number-board, but allowing heat/air out/in to the rad.


The rad, and just about everything under the tail will need to be blacked-out.
Mesh is just taped up at the moment but will be epoxied into place post-paint.