Servicing Ohlins electronic forks

Where all the workshop knowledge lives together.
Post Reply
tony.mon
Posts: 15973
Joined: Wed Jul 25, 2007 10:46 pm
Location: Norf Kent

Servicing Ohlins electronic forks

Post by tony.mon »

I have an Aprilia Tuono with semi automatic forks. Ohlins make a range of these; they're fitted to quite a lot of new bikes now, notably Ducati, KTM, Yamaha and quite a few more.

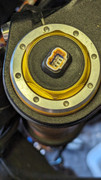
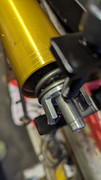
The forks work like normal (right way up) or upside-down ones but the damping (compression and rebound) is controlled by a little electric motor in the fork leg, and it senses the road conditions and riding style using (usually) a six-axis motion sensor in the ECU and adjust the compression and rebound damping to suit, as you ride. The measurements and adjustments can take place many times a second, so it is dynamic.But it can't predict what's not yet happened, so, for instance, automatically softening the forks' compression setting as you approach a bumpy section of road isn't possible, (Yet!) -although you can, on most bikes, change suspension maps by pressing a button or two while you're riding. So as you turn off a motorway onto more twisty roads, you can stiffen everything up.

You still have to adjust preload manually in mine, but I see that some bikes now have automatic preload adjustment on the rear, or even front and rear) which senses whether you are carrying a pillion or luggage and adjusts accordingly. Mine doesn't, so I won't cover that in this how-to.

The rider can pre-select a set of parameters which offer a range of settings to suit your ride, for example a softer setting for motorway cruising, a stiffer set when you're romping on a bit, and a setup suitable for a racetrack. They might be called A, B and C, or Road, Race and Track, or something else. Each manufacturer seems to use differing names or acronyms. There are often some personal settings options, where a rider can select their own preference for each group of settings, and save these as a map that they can select when needed. As an example, I like a particular map but find the throttle action a bit quick for bumpy roads, so I have saved a map with a slower throttle action for times when I want to use it. I also prefer a bit more steering damper (yes, they can be controlled electronically, too).

Usually there are other adjustments contained within these packages, such as how quickly the throttle opens the throttle bodies (mimicking a quick action throttle), traction control, ABS, how high the bike can wheelie, steering damper setting and, often, rear shock settings, too.

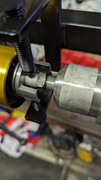
So because this type of forks are connected to a lot of complicated electronics they might seem a bit daunting to service, even if you are happy servicing non-electronic forks.

I wrote this to try to demystify the process of servicing this type of fork. Basically, they're pretty much the same to service, apart from unplugging the electrical connector, but although I have serviced right-way up and upside-down forks many times in the past, (mostly on Honda's), Ohlins are a little different.

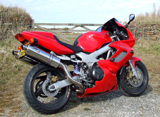
Lots of people on this forum have other bikes, and some of these have leccy legs- hopefully, this will be useful when yours needs a service.

Lastly: no, sorry :thumbdown: you can't upgrade a Storm to semi automatic suspension- it requires lots of complicated sensors and a different wiring harness, plus an ECU capable of controlling the setup.
By the time you've added all that, it's way too expensive to be a possibility, even if you could find suitable parts. It would make much more sense to sell your bike and buy one that has all of this as standard.

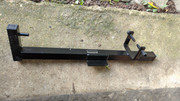
In the next part I'll talk about the tools you will need.
Last edited by tony.mon on Fri Feb 23, 2024 10:09 am, edited 1 time in total.
It's not falling off, it's an upgrade opportunity.
tony.mon
Posts: 15973
Joined: Wed Jul 25, 2007 10:46 pm
Location: Norf Kent

Re: Servicing Ohlins electronic forks

Post by tony.mon »

Part 2:

I'm going to assume that you have taken forks apart before, and you have a general toolkit and some mechanical knowledge.

My Ohlins forks are model number FL9350. All of the following applies to these forks, and I haven't stripped any other Ohlins forks, so I don't know what differences there might be between different models. Having said that, I would expect the differences to be mostly leg length, shims and internal specs, plus (if you have this) electronic preload gubbins. I would think that most Ohlins forks would be pretty similar to strip and rebuild, so this post is probably enough to service your own Ohlins forks, even if they're a different model number.

I also take no responsibility for any damage you might do!
This is intended as a record of my experience in stripping and rebuilding my own forks, not as a definitive workshop manual.

Tools I needed:
The top of each fork leg has a cap where the electrical connector is. It has a large nut which is the preload adjuster nut. But the actual cap has eight holes drilled in it, so you need a special tool to engage with the socket.
Image
I found that Laser Tools make one that fits- it is their part number 6364, costing about £42.
Image
It is actually sold for Ducati Mechatronic forks, and doesn't list Aprilia's on the listing or packaging. I had carefully measured the pin hole diameter at 2.5mm, and the pitch circle diameter as 42-42.5mm, and this one fits perfectly. Measure your forks, if they are a different Ohlins model number, to make sure they are the same; and buy the correct socket if not. Ideally you need a socket with the same number of pins as there are holes, even though the holes are opposite each other and equally spaced, so you could potentially use a four-pin socket for an eight-hole cap.

A seal driver- I already had one that was the right size- 43mm diameter.

A fork leg compressor. These come in two types- one has a circular section with two bar handles that are on opposite sides. These screw into the circular section and engage in the spring preload sleeve's two holes. You can them push the spring down to expose the top cap's locking nut and remove the top cap. Having used this type in the past I found that it was almost impossible with only one person- you needed two hands to compress the spring, and another one to slip a slotted flat strip (or spanner) onto the locking nut, and so a second person is very useful/essential.

The other type is a long bar with a screw thread along its length. By turning a nut on the end of the thread is lengthens or shortens the unit- with the one I bought it also have a section that you can clamp in a vice to hold the leg at a convenient height and angle. I bought a Sealey model MS 1824, which cost me £75. It turned out not to be exactly the right tool for the job, but I found a way to use it, which I'll explain later on.
Image
The reason I needed to service my forks was that the seals were leaking, so I also needed two Ohlins seals, plus the two dust seals. I considered re-using the dust seals, but decided that it was best to do the job once and properly rather than risk having to pull the forks apart again in a short while.

I also needed a litre of 5W fork oil- I used Motul, as Ohlin's oil wasn't easy to find. Check to see what weight is specified for your model.

The cost of the seals and oil came to £93, inc delivery; so in all, I paid £210 for the tools and parts. But next time I need to do the job it will only cost me oil and seals, so it will be less next time round. For comparison, I was quoted around £200 for the work to be done to loose legs at a good local suspension specialist that I trust. Bear in mind that I already owned the seal driver, though. They are between £12 and £25 for a two-part driver.
Image
I choose to do all of the work that I can on my bike, so even though the cost this time round was a little more than having the work done by a professional, I'm happier with buying the tools and doing it myself.
Last edited by tony.mon on Fri Feb 23, 2024 10:29 am, edited 2 times in total.
It's not falling off, it's an upgrade opportunity.
tony.mon
Posts: 15973
Joined: Wed Jul 25, 2007 10:46 pm
Location: Norf Kent

Re: Servicing Ohlins electronic forks

Post by tony.mon »

Part 3: strip down

The top of each fork has the electrical connector- they are apparently fragile, so be careful how you disconnect them. Push the small tab in and pull the connector off.

Now check (and record) how many rings are showing above the top yoke!
After that, unwind the preload nut (you will want to place a plastic bag over the nut to avoid damaging the anodised finish, unless you have a cushioned socket, you flash bugger). A plastic bag worked for me. Record how many turns of preload you unwound! you will need to add this back again when you reinstall the legs. On some bikes you will need to undo and move the handlebars- I converted mine to clip-ons, so didn't have to.
If you have them, undo the two-part clipons- if yours are one-piece you can loosen them and the leg will slide out through them.

Using the correct pin socket, loosen the top cap. Don't undo it much at this stage, just enough to crack the tightness. When you have the leg out it will be hard to hold without damaging the finish- or worse, compressing the leg out of round, so it's better to loosen the top cap before you remove it from the yokes, as they will hold it firmly.

The forks come out like any other bike- remove the brake callipers and front wheel, then the mudguard plus the wheel speed sensor, and take a picture of how any wires and cables are routed- some may go in front of each leg, and some behind. You can then loosen the lower yoke bolts and finally, the upper ones, holding the leg so that it doesn't fall. Ease it gently down and out of the yokes.

I prefer to work on one leg at a time- if nothing else, you have a pattern to work with should you lose track of which part goes where on the one you're working on.

Now you can use the pin socket to remove the top cap. The top cap is screwed fully onto the damping rod, and locked in place by a nut.
Image
You need to turn the top cap against the locking nut in order to remove it. Sadly, you can't get to the locking nut until you compress the fork spring so that the nut is accessible. So place the fork leg into the leg compressor by inserting the pin at the lower end into the hole at the lower end of the leg under the axle hole, and adjust the compressor so that it bears down on the aluminium castled washer beneath the locking nut.
Image
This is what I meant when I said that the leg compressor wasn't quite right for the job. For the USD forks I have worked on previously the plastic preload tube is at the top, above the spring- and because that has two holes in the sides, the spring compressor fits neatly. In this case the plastic preload tube is at the bottom, under the spring, send so you have to apply pressure directly onto the aluminium castled washer. By adjusting the length of the screw-in pins at the top of the leg compressor, I found that I could apply pressure the the castled washer and move it far enough out of the way to get at the locking nut. Not ideal, but it worked well enough. I expect that Ohlins will sell you a specialist tool to do the job....

Now you can finally undo the locking nut and undo the top cap.
Image
You will probably have to hold the preload nut rather than use the pin socket.
Pull the top cap out gently; there is a long rod attached to it. Put it somewhere safe and out of the way.

Remove the locking nut and loosen the leg compressor.
Remove the castle washer, then the spring. The spring will pull oil with it, so have a rag to hand. Make a note of whether your spring has the closer coils to the top or the bottom. Lay the parts out in the order you removed them, on a clean rag or paper.

Now you can invert the leg over a container to catch all of the oil. Pump the damping rod, so as to get as much oil as possible out. It's at this point that the plastic preload tube will fall out, so catch it and place it with the other parts. Don't panic (as I did) when it drops out and you realise that you don't know which way up it's meant to go; I'll cover that when we start the re-assembly.

You can now slide the stanchion out of the upper tube.
Using a thin blade, gently lever the dust seal out of its place and slide it up the stanchion. Gently lever the retaining spring circular clip out of its groove and slide it up out of the way.

Using a soft tool- wood or plastic- gently lever the seal out of its position, working around in a circle to ensure that it comes out evenly.

That's the strip-down complete, (I didn't need to change the upper or lower slider bushes, so left those alone). If yours need changing/replacing or inspecting, there are some you-tube videos covering that process.
Examine all of the parts carefully to make sure that there are no scores or pitting in the stanchions, and clean thoroughly.

I prefer to use a little smear of red rubber grease when fitting seals, on the inner edges only. Although the spring clip holds the seal into the leg, you want the seal to fit firmly into its housing.
Push the new dust cap, retaining spring and fork seal onto the stanchion, making sure that they all face the correct way round- (open end of the seal and dust seal upwards). Using your seal driver, drive the fork seal fully home. You can hear a change in note as the seal is fully home- and the clip groove is clearly visible. Fit the spring clip and push the dust seal home. Use the seal driver if you need to.

An observation re the dust seals- the ones fitted by the factory had a circular spring visible on the outside when the dust seal was in place, but the new ones didn't. I spoke to an Aprilia specialist who said that there are two types and Aprilia send whatever they have in stock- some have springs; some don't. Check to make sure that you have the correct parts.

In the next part we will refill with oil and reassemble the fork leg.
Last edited by tony.mon on Fri Feb 23, 2024 10:38 am, edited 3 times in total.
It's not falling off, it's an upgrade opportunity.
tony.mon
Posts: 15973
Joined: Wed Jul 25, 2007 10:46 pm
Location: Norf Kent

Re: Servicing Ohlins electronic forks

Post by tony.mon »

Part 4- refilling the oil and reassembling the leg

Refilling the oil:

For my bike the oil level was 181mm from the top of the upper tube, with the leg compressed but the spring and preload tube removed. Check what's required for your model; it might be different. Slightly overfill with oil- mine needed just over 400 ml per leg, so I added half a litre to start with. Pump the damper rod up and down a few times- be careful, as oil will spurt for the tube's upper opening if you do this too quickly.

Holding the leg vertical, use a fork oil level device to remove the excess oil until it is exactly the required air gap from the surface of the oil to the top edge of the upper tube. You can buy a device to do this; I use a syringe and a long screwdriver with a section of airline tubing taped to it with a marking at exactly 181mm from the open end of the tube. It does the job well enough. Dispose of the oil you suck out- even though you cleaned the old oil out, there will still be some traces contaminating the new oil, so use fresh oil (the other 500ml) for the other leg.

Pulling the leg fully open, insert the preload tube- the larger diameter end is uppermost, and fits onto the lower coil of the spring. Insert the spring, making sure that you have the close coils, if any, at the correct end. Clamp the fork leg compressor in a vice at about a 30 degree angle from horizontal. That way, the oil stays in but the leg doesn't try to compress whenever you let go of it. Fit the compressor pin into the hole at the lower end of the fork leg, and holding it in place, pull the damper rod fully out (not too quickly), then slide the castle washer onto the damping rod. Now you can start to compress the spring using the leg compressor, until you can screw the locking nut onto the damper rod. Screw it near to the bottom of the thread.

Insert the top cap into the damper rod, until it is fully home on the thread of the damper rod. Because the leg compressor is holding the castle washer down, you should now be able to tighten the locking nut against the top cap. Because you now need to screw it in the opposite direction to disassembly, you cannot use the pin socket to hold the top cap- instead, use the preload nut (remembering to place a plastic bag under the socket of spanner).

Tighten the locknut against the top cap, then remove the fork leg compressor. Stand the leg on the ground, (on a rag to protect the lower end), and by pushing down on the top cap, engage the cap into its threads. Screw the top cap down as far as you can by hand.

Slide the leg back into the yokes (and through the clipons if you don't have two-part ones), making sure that the wires and cables go forward or behind the leg as per your picture from earlier. Check to make sure that the leg shows the right number of grooves above the top yoke, and tighten up the top and lower yoke bolts. You can now re-torque the top cap using your pin socket.

Now do the same to the other leg.

Before you go any further, remember to wind on the preload to the same setting as previously.

Refit and adjust the clipons or handlebars, reconnect the electrical connector, refit the mudguard, wheel, calipers and speed sensor, and make sure everything lines up as it should.

That's you done, mate.....best get out and ride it.
It's not falling off, it's an upgrade opportunity.
tony.mon
Posts: 15973
Joined: Wed Jul 25, 2007 10:46 pm
Location: Norf Kent

Re: Servicing Ohlins electronic forks

Post by tony.mon »

I'll add pics on Wednesday
It's not falling off, it's an upgrade opportunity.
User avatar
sirch345
Site Admin
Posts: 21748
Joined: Mon Aug 25, 2003 10:35 pm
Location: The West Country.

Re: Servicing Ohlins electronic forks

Post by sirch345 »

A cracking write -up Tony, many thanks for taking the time to do this :clap: :clap:

Chris.
User avatar
Duffy1964
Posts: 2927
Joined: Mon Jul 25, 2011 4:15 pm
Location: Orpington Kent

Re: Servicing Ohlins electronic forks

Post by Duffy1964 »

Great write up Tony, and well done for tackling the job and discovering how it operates and dismantles.


Sent from my iPhone using Tapatalk
Duffy1964
Yellow 1997 Storm R.I.P. Orange 2000 Streetfighter (Rufus), Red & Silver 1968 Triumph Trophy 650, Blue 2003 Storm Project, Red 2007 Montesa Cota Trials 250 & 1959 BSA D7 175cc Bantam Trials Project
Post Reply